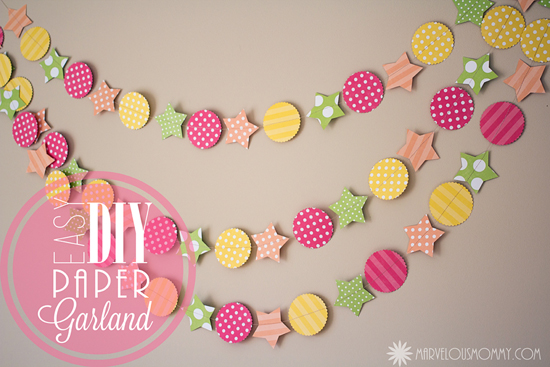
I love garlands. They are great for party decorations or photography backdrops and can be reused over and over again!
This is a picture of my daughter with the garland laying over a plain white shower curtain. Cheap and easy background, plus it’s cute, right?

Supplies:
- Double-sided Card Stock or Scrapbooking Paper
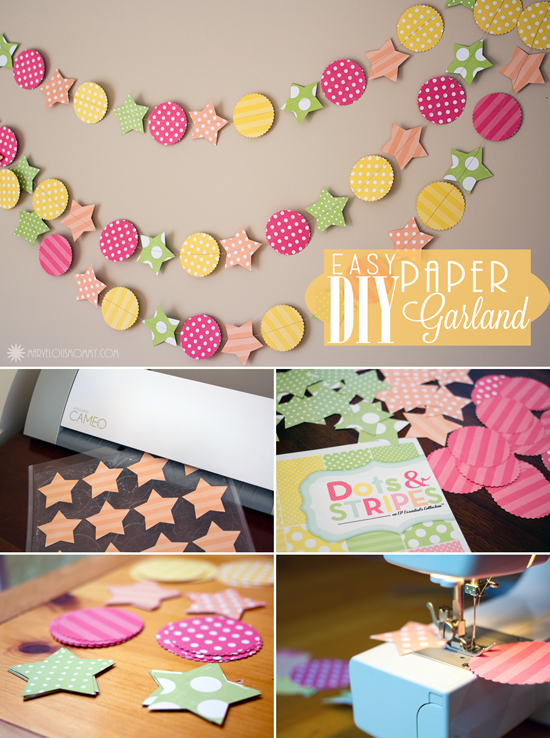
- Scissors or cutting machine (silhouette cameo)
- Sewing Machine
You do not need a cutting machine for this project, although it does make it a lot easier.
If you do not have a cutting machine, I would recommend cutting circles or hearts. Nothing too detailed or it will be too hard to get clean edges.
Fold your paper in half and cut multiple sheets at once to get symmetrical shapes when cutting by hand.
Once I had all the shapes cut, I laid them out in a pattern I liked. It’s easier to grab and go from an assembly line while you sew. That way you don’t lose track and sew the wrong one.
If you can do a basic stitch on a sewing machine, then you can sew these! Don’t be intimated!
This is the first time I’ve used my sewing machine since I bought it! (I’ve only had it 4 years!)
You want a medium length stitch. A short stitch will actually cut right through the paper.

3D Option:
For a 3D effect, you do the same exact thing, just double your paper. Sew through two sheets of paper, then fold along the seam.
Easy peasy!
No-sew Option:
If the thought of using a sewing machine totally freaks you out, then you can use a hole punch and make a small hole at the top of each shape
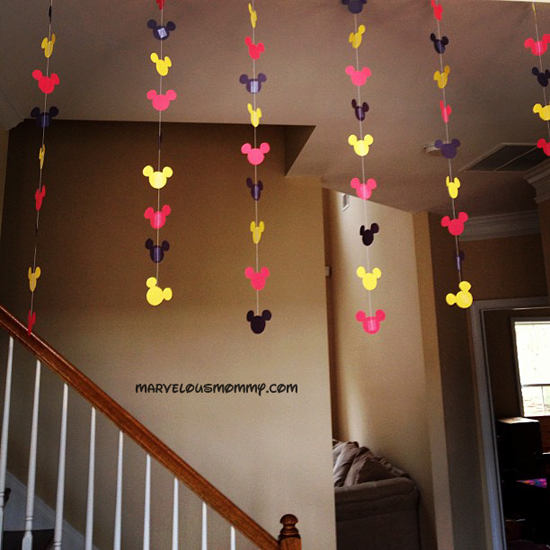
OR just tape some string on each shape like I did with this Mickey Mouse Garland which I also cut out of construction paper by hand. I didn’t have a Silhouette Cameo to help me then. I believe I cut 6 at a time.
And for the 3D option, again you would use two sheets of paper instead of one. Then hot glue each of the shapes together with a string down the center, and fold them out after the glue has dried.
I believe I covered everything and then some in this post, but let me know if you have any questions. If you enjoyed this post, please pin it for others or follow me on Pinterest!
This garland look so pretty and easy to make. Love it!
Thank you! It was actually pretty fun!
This turned out really cute! I need to make one of these to brighten up my daughters room!
Oh absolutely! That’s a great idea! Now i need to make another one for my daughter’s room!
Really really cute! thanks for sharing, I’m going to pin this post! lovely!
Thank you! 🙂
These turned out so cute and fun! Love the different patterns you chose, and the 3D garland looks amazing!
How can you not ADORE that Mickey Mouse garland!!! Hey, btw, did you see our Halloween paper garlands on the blog, the Fine Craft Guild. Handmade by yours truly. Free templates. Check in the Halloween section…
Your garlands are about the cutest I’ve ever seen. Do you think you could share it at our Making Monday link party next monday? We’d love to have you and I know our readers would love it, too. Thanks, have a fabulous weekend.
http://www.abrightandbeautifullife.com
These are so cute!!
Oh my gosh, I am so not crafty and I am awesome at breaking my sewing machine but I really want to try and make these. They’re so cute!
Stopping by from Pin It Forward. This is a great post and I just adore your garlands!! Very creative!!
Great project !!
I would love you to come and share @ Craft, Create & Inspire linky party !!!
Look forward to seeing you there 🙂
http://lemonpaperdesigns.blogspot.co.uk/2013/10/craft-create-inspire-linky-party.html
Claire x
I am going to have to make a new garland for Halloween or Thanksgiving. I made one for Valentines Day years ago, and we still use it. The kids always put it up. Thanks for the great inspiration.
What a brilliant idea to run them through the sewing machine! So easy! Love it 🙂
Stopping by from Make my Saturday Sweet, Dawn from http://www.IThinkWeCouldBeFriends.com
Wow, this doesn’t sound difficult at all! I think it would a great way to decorate for holidays!
This is so beautiful!!! I haven’t tried sewing a garland, yet… but you have definitely sparked a desire to try one! Thanks so much!
I remember the first time I made a garland like this, my mom told me to run it through the sewing machine and I was so nervous about it. Wish I’d had your tutorial then! And thanks a bunch for linking up at Link It or Lump It!
I love the simplicity! Very cute!
That mickey mouse garland is supreme! I love paper anything really so enjoyed your post, now if only I could sew! 😉 visiting via ‘lovelyladies’ linky from over at http://www.ritewhileucan.com
Such a cute idea! I’ve been thinking about DIY’ing some Holiday Garland, so this is great! I’m hosting a giveaway for an awesome starburst mirror that you should enter! http://homecomingmn.blogspot.com/2013/11/starburst-mirror-giveaway.html
I would love for you to share this on our link party
http://bloomdesignsonline.com/
LOVE, LOVE, LOVE what you’ve done. I’m going to make each of my daughters one since they share a room. About how big are your shapes? For instance, the circles, what’s their diameter?
Wow, this took me right back to 1965 when my eldest sister got married. Very little money and so her 5 sisters were set the task of making paper garlands using 3 sheets of crepe paper. Stitched together on my Mum’s singer treadle machine. We then snipped the edges to make it frill. They looked great and brightened up the village hall no end. Thank you for taking me down a happy memory lane. I’m going to get out my old singer hand machine and make some paper garlands for Chritmas. Take care all.