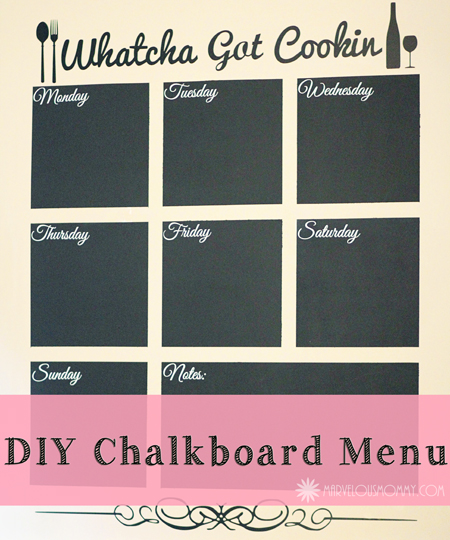
As you probably know, we just bought our first house a few months ago. I’ve been getting lots of decor inspiration from Pinterest (of course) including this marvelous Menu Board I found.
That one is done on a piece of wood, which is great if you are renting or need it to be removable, but we no longer have crazy landlords to deal with so I did mine right on the wall.
Whatcha Gonna Need:
- Painters Tape
- Chalkboard Paint (or chalkboard spray paint)
- Paint Brush or Roller (fine finish roller works the best)
- Measuring Tape
- Silhouette Cameo for lettering (or stencils)
- And a handsome husband to do all the work
Okay okay, you really don’t need that last one, but he sure does come in handy. My husband really did most of the work (like, all of it) but someone has to take pictures, right?! And I’m confident that could’ve tackled this project all by myself, so do not fear if you’re doing this solo.
Step 1
Clean any dirt or dust off the wall and let it dry completely. Then tape your wall. We decided to do 12 inch squares and there is a 1.5 inch gap between each square (because that’s how wide our tape is).
TIP: A laser level made this process very quick and painless (even though my husband still checked and rechecked the measurements a million times).

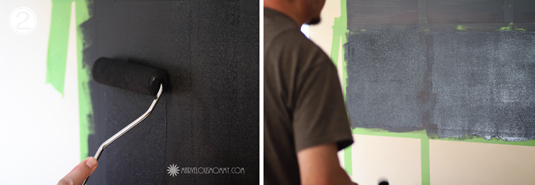
Step 2
Once your tape is securely on the wall, you can paint! Keep a wet cloth nearby for any drips.
TIP: To prevent paint from bleeding under your tape, you can paint the edges with your base wall color and let it dry before painting with the chalkboard paint.
We didn’t have any paint since the house was (terribly) painted before we bought it. But our lines turned out clean with minimal bleeding and you can always touch it up later.
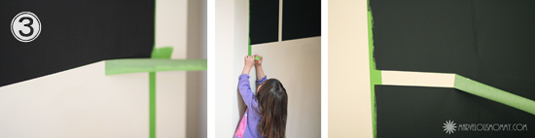
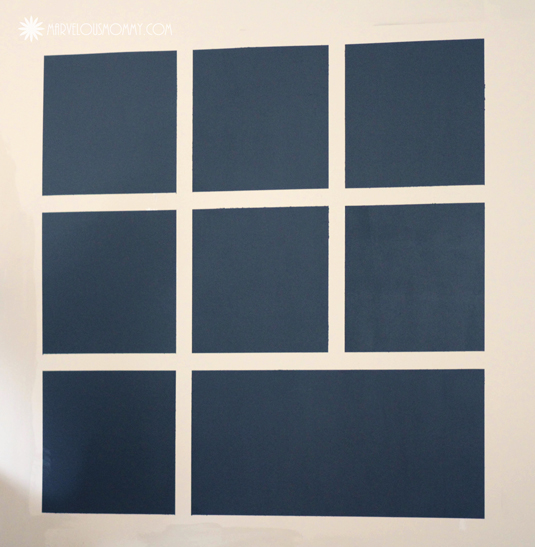
Step 3
After your paint has dried, you can remove the tape. My girls liked helping with this step.
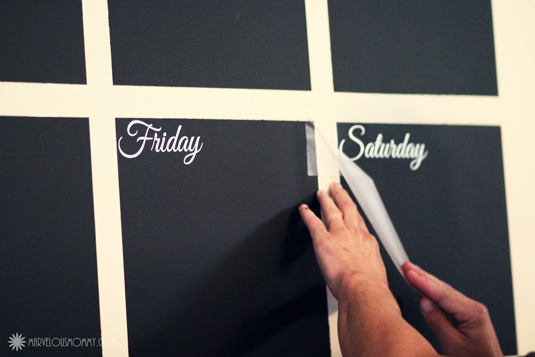
Step 4
Add your letters. My lettering is made out of black and white vinyl. I designed it in Silhouette Studio and used my Silhouette Cameo to cut them out. I wasn’t thrilled with the bottom swirly scroll. The good news is that the vinyl is easily removable so I can change it any time I want!
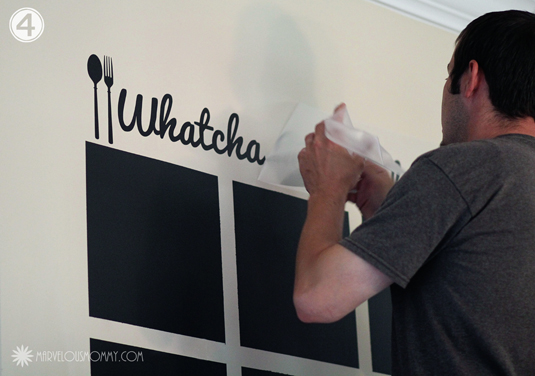
If you don’t have a cutting machine, you can paint the letters on using a stencil. And if you have a really steady hand, you could always freehand it.
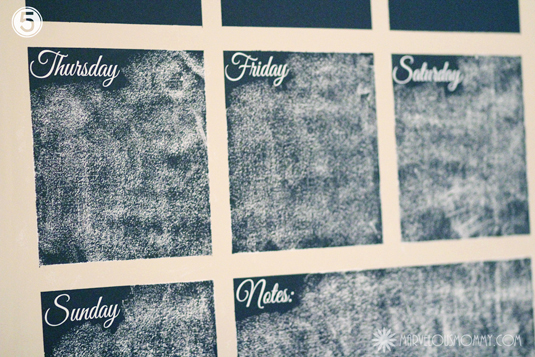
Step 5
Prime your chalkboard. After painting on chalkboard paint, you’ll need to prime the surface with chalk before writing on it. Take your stick of chalk, holding it on its side, completely cover the entire chalkboard, then erase it and it’s good to go.
TIP: Make sure your paint is completely dry to prevent damage to your fresh paint!
And BAM you’re done! Now you’ve got a marvelous menu wall to keep up with your meals for the week!
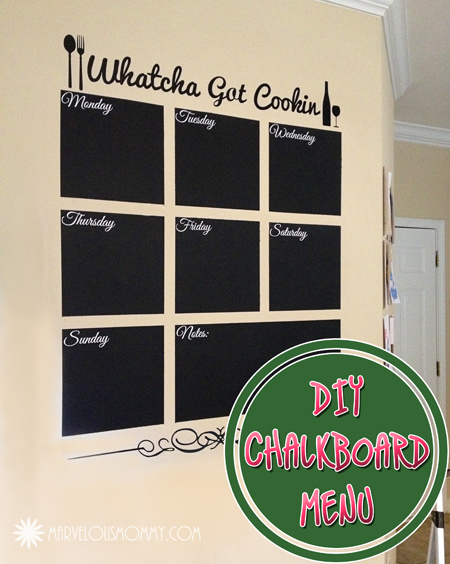
Here’s our meal plan for this week:
- Monday: Angel Chicken
- Tuesday: BBQ Sandwiches
- Wednesday: Grilled Pork Tenderloin
- Thursday: Roasted Garlic & Bell Pepper Chicken Thighs
- Friday: Meatball Sliders
- Saturday: Lime-In-The-Coconut Drumsticks
- Sunday: Grilled Honey Chicken Skewers
Love your DIY Chalkboard menu. so creative and looks amazing!
Thank you! 🙂
What a great menu board idea! This looks like such a fun way to keep track, I sure wish my kitchen was bigger so I could do it. Congrats on your new house too! 🙂
Thank you so much! It’s been 3 months since we moved in and things are finally starting to come together!
This turned out awesome! Pinned! So cute.
I’m the artist in the house – I don’t trust Hubs to paint anything – the walls included! 🙂 Looks great!
This looks great!!
Oh this is such a cute, and more importantly, handy idea! You aligned and designed it perfectly; the Notes box looks so useful! I’m not too familiar with Silhouette Studio, but your fonts are lovely and that bottom curl looks fine from your photo! Thanks for sharing the tutorial!
I LOVE this idea! So great! It looks really fantastic, and I wish I had a wall I could do this on! Thanks for linking up with PinIt! Tuesday! Hope to see you next week too!
Love this idea! I am considering something like this for my pantry door.
Great job! Pinned it!!!!
REALLY LIKE THIS. Phenomenal job. Totally pinning this one!
I’m so loving this! Thanks for linking it up last week at my menu plan monday! Super job on the tutorial! You are being featured this week in my menu plan that goes live Monday morning! Susie
Oh how marvelous! 😉 Thanks so much!
This turned out so well! I don’t have the wall space for something like this in or near my kitchen, but this would be fun for a kids room, too!
Love your chalkboard menu wall! So cute! I love the fonts you picked and how the whole thing turned out.
KC
This is…FABULOUS! Delightful indeed. And I know just the wall that needs attention…thanks for the tute! 🙂
Found you through the Favorite Things Blog Hop!
This is so cute if only I had a wall large enough for it in my house.
This looks great! I’m trying to find a menu planner style that would work well for our house. Thanks for the inspiration!
I love it! You did a great job!!
I absolutely adore this project! Hmmm, now to find a wall in my itty-bitty kitchen that this would fit.
I have been surfing on-line more than 3 hours nowadays, yet I
never found any interesting article like yours. It’s beautiful
value sufficient for me. In my view, if all site owners
and bloggers made excellent content material as you did, the web will probably be
a lot more useful than ever before.
Love It!!!! Gotta pain this 🙂
I have seen a lot of chalkboard menus and I have to say, I am (by far) loving yours. We’ll be moving soon so I have put off placing one in our current kitchen but its on the top of my list for the new house. Stopping by from the SITS party!
This is adorable! Love it!
I think I will try something on a smaller scale. My friend has a wall in her bathroom painted with chalk board paint and people visit and draw really cool stuff on the board. LOL